Vertical gardening trial
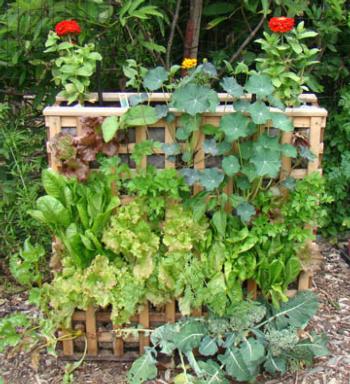
Master Gardener Laurel Nagle conducted a trial to build and plant an attractive vertical container that would allow those with limited space to grow edibles, herbs, and ornamentals.
This page describes how she built the container, what she planted in it, and what she learned.
Materials
To build the container, Laurel used:
Five 1”x12”x3’ redwood boards
Two 1”x12”x3’ redwood boards, cut along the length so that they tapered down to 8” wide on one end
Twenty 5/8”x 2”x3’ redwood boards for the front lattice
Two 5/8”x2”x38” redwood boards for the top rim
Two 5/8’x2’x6” redwood boards for the top rim
3.5’x3.5’ weed fabric, seed covering, or other material to line the back of planter
3.5’x3.5’ seed (or floating row) covering or other lightweight materials to line the lattice
A hammer, assorted nails, and a staple gun, for anchoring the fabrics
All of the wood was untreated; some was rough and some was finished. Laurel was able to find some of the wood at a salvage yard, so the approximate cost for the planter was $75 for the wood. A roll of seed covering is about $15.
To fill the container, she used:
2 bags (2 cubic feet each) of high quality potting soil
½ bag (8 quart size bag) perlite
Compost from Elkus Ranch
1 Jiffy 25 Pellet set which includes reusable plastic greenhouse
To plant the container, she used:
6 seedlings from 1.5” pots
1 vegetable 6-pak
4 packets of seeds
3 types of saved seeds
2 succulent cuttings
The total cost for planting materials was approximately $60. (This cost is higher than it would be for a typical gardener, due to the fact that Laurel tested a wide range of plants in this trial.)
General methodology
After researching vertical planting containers, Laurel discovered that manufactured containers can be expensive, and that many people build their own. She wanted something that was easy to build with materials found in a typical building supply store. The design needed to be adaptable to the home gardener’s needs. Below is her container design, which her husband and son built it in one afternoon.
Once the planter was built, Laurel transported it to Elkus Ranch, sited it where it would get maximum sun exposure, and filled it with a planting mix of potting soil, perlite and very wet compost from Elkus Ranch.
She wanted to experiment with a variety of planting methods so she started some seeds in Jiffy Pack Pellets (available at Home Depot and other stores), purchased some seedlings sold in six-paks, a few herbs in 1.5” pots, and started a couple of succulent cuttings from her garden. She limited the plants to commonly available edibles, ornamentals, and to cuttings with a stem of at least 1.5” to secure into soil.
Building the planter
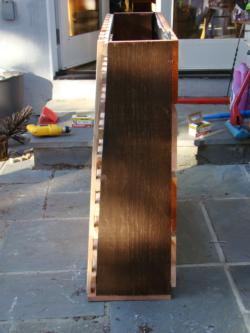
The planter is 3’ x 3’. The bottom of the planter is 12” deep and the top is 8” deep. The top is recessed from the bottom so the lattice angles back a few degrees, ensuring that sunlight reaches the entire surface.
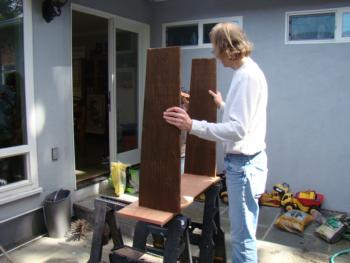
The top is 8 inches wide, the sides are 3 feet tall, and the bottom is 12 inches wide.
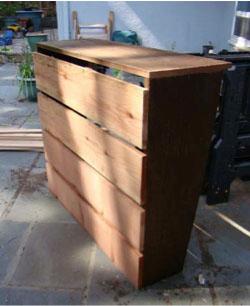
Approximately 16 holes were drilled, using a 3/16” bit, into the bottom to also help with drainage.
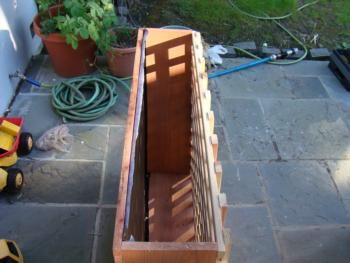
Inside the planter, weed fabric was stapled to the back wall. This keeps the soil from falling out of the spaces between the boards, but allows drainage and air circulation.
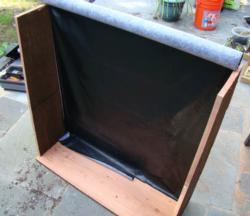
The slats (2” x 5/8” redwood) were laid out in a grid, to create openings that were approximately 2”x2”. The structure was lined with a lightweight row cover to keep soil inside.
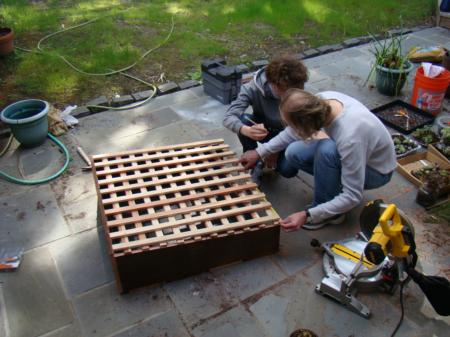
A small, ½” space was left along the bottom of the back wall for air circulation. Not shown in these photos is a 2” redwood rim that we nailed along the top of the planter. This wasn’t essential but gave the planter a finished appearance and prevented scrapes when reaching inside.
Planting
The interior was filled with a mixture of
40% compost from Elkus Ranch (which was very heavy and wet)
50% organic potting soil
10% Perlite to lighten the mix
As the soil was added, seedlings were transplanted by poking through the lattice at various heights. Planting at the same time as filling the container is the best way to ensure that the roots come into contact with the soil. To insert the seedlings, small slits were made in the row cover, the plant inserted and additional soil was added.
Transplants were of two types: seedlings from a six-pack (the roots were loose and some of the original soil was left behind), and seedlings that were sprouted from Jiffy Pack Pellets. These are essentially disks of peat moss that expand when moistened. They form a cylindrical form that is held in place by a biodegradable fabric sleeve.
This initial set of plants was grown to maturity and evaluated. Eventually, many plants were replaced for a second season of growing.
The second round of transplanting presented some difficulties:
1) To create a large enough space for the new seedlings, Laurel had to use her fingers to push the dirt up, down, and to the sides. This made a “cave” in the soil. The soil mixture was sticky enough to allow the “cave” to hold for a few minutes while I inserted the new plant. Unfortunately, it was difficult to push soil back around the seedling and ensure good root contact. A few seedlings dried out and died.
2) Because a relatively large horizontal planting hole was created, transplants weren’t well supported and water sometimes ran out these planting holes.
3) It was messy to pull out mature/dead plants, as their roots brought out potting soil.
4) If a new plant wasn’t put in as a replacement, there was no barrier to soil and water coming out of these gaps. The row cover had already been cut and the stabilizing roots pulled.
To ameliorate these problems:
Laurel used chunks of sphagnum moss tucked into the holes or around the seedlings to secure the soil inside the planter. The moss also kept the roots moist until they could reach planting soil.
She also found that starting seed with the Jiffy Pak Pellets kept the roots and growing medium supported in a biodegradable pouch. Insertion into the planter was easy and clean, and the growing medium kept the plant growing until it could reach the potting soil.
If the plant being removed was an annual that would not resprout and was in a square that wasn’t going to be immediately replanted, Laurel cut the plant down to its base (rather than pulling it out). The roots could decompose into the soil and would prevent water and loose soil from falling out.
Irrigation
Laurel created a drip irrigation system for the planter. She took two lengths of black irrigation tube – 1” in diameter and 24” long – and used an awl to punch several holes in each. The holes were distributed along the bottom 12” of each tube. Each tube was inserted into the planter from the top. They were pushed down until only 6” remained above the soil line.
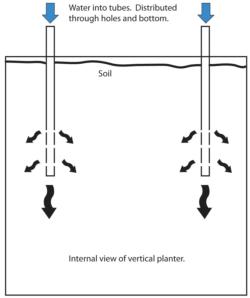
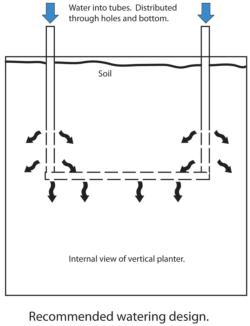
When watering, she held a hose above eac h tube to allow water to flow into them and distribute water to the lower levels. She also manually watered the top of the soil with the hose. The container only needed weekly watering until August; after that, it needed watering twice a week. The biggest danger was that the lower half of the planter didn’t receive enough water.
Based on this experience, she recommends connecting the tubing to create a “U” shape, to help distribute water throughout the bottom half of the planter.
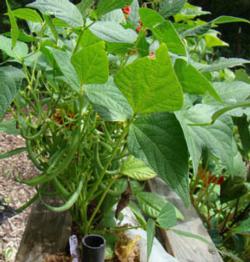
Most of the plants used for this project were edible, and were transplanted seedlings. In general, the plants grew healthy and vigorous. Most seedlings also displayed phototropism, bending to grow up towards the sun, rather than straight out of the vertical planter. Significant damage to plants was due to a large population of slugs, likely introduced via the compost. Cucumber beetles were a problem for the bean plants and a few earwigs hid in lettuce leaves and under the planter ledge. Manual harvesting and spraying with the hose eventually reduced plant damage.
As shown in the photo at the top of this page, the lettuces turned up towards the sun and grew at a vigorous rate. The Romaine lettuce grew larger than expected and smothered other seedlings. The broccoli in the bottom suffered from excessive slug damage, but was normal in size. Parsley grew exuberantly the entire summer and fall. It needed weekly harvesting to keep under control. A few carrots were transplanted via Jiffy Pack Pellets. The carrots grew fine, but harvesting was difficult. The tap root grew down and sometimes broke before the entire root could be pulled. Nasturtiums cascaded down over other plants, blocking light and inhibiting growth.
Specific plants and results
|
Plant |
Result |
Comments |
Yield |
|
First planting Baby Romaine Lettuce** |
Very good |
As the plant grew it blocked the lattice spot directly above. Space accordingly. Slug damage. |
Harvested leaves for 2+ months. |
|
Red Leaf Lettuce, 'Rosso'** |
Very good |
Slug damage. |
Harvested leaves for 2+ months. |
|
Broccoli, Hybrid F1 |
Good |
Slug damage. |
One small-medium center stalk. |
|
Bush Beans, 'Purple Queen'** |
Good |
Growth Inhibited by cascading nasturtiums. Weather not warm enough. |
6-8 beans. |
|
Bush Beans, 'Emerite' |
Good |
Growth Inhibited by cascading nasturtiums. Weather not warm enough. |
8-10 beans. |
|
Pepper Plant, Anaheim Chile |
Below average |
The weather was not warm enough and the seedling was usually shaded by other plants. |
One small pepper. |
|
Parsley, Flat Italian |
Excellent |
Limit the number of seedlings per lattice square. |
Continual and robust harvests. |
|
Nasturtiums** |
Very good |
Attractive addition, but crowded out or shaded many other plants in the container. Gravity forced the plant to look leggy when mature. |
Flowers were not harvested, but plant produced an average number of them. |
|
Carrots, Nantes** |
Poor |
While the carrots did grow, the root aims down which makes harvesting very difficult. The bottom half of the carrot broke off and remained in the planter. The sharp angle of the root made retrieval almost impossible. |
Two partial carrots. |
| Second planting Thyme |
Very good |
Easy to grow. Attractive mound. |
Continual and robust harvests. |
|
Oregano |
Very good |
Needs to be regularly monitored because it sends out runners underneath the slats and spreads to other sections. |
Continual and robust harvests. |
|
Peppermint, Chocolate |
Very good |
Not surprisingly, needs to be regularly monitored because it sends out runners underneath the slats and spreads to other sections. Can be aggressive. |
Continual and robust harvests. |
|
Sempervirum |
Very good |
Easy to plant. Can create decorate patterns. |
|
|
Snap pea** |
Below average |
The pea plants attached to other plants on its way up the lattice front. Competition for sun and pest damage resulted in weak, spindly plants. Mildew also developed. |
A few small snap peas. |
**Started by seed in Jiffy Pak Pellets.
Note: Bean plants were actually planted 6 weeks after the initial planting because the soil and air temperatures were too cold.
Conclusions
Vertical planters are viable way to garden and are particularly useful when ground space is at a minimum. They can be used to grow edibles, flowers and visually create a beautiful tapestry.
Key issues to remember when using a vertical planter are:
- Keep the sun’s rotation and the mature size of the plant in mind when deciding where to locate seedlings. Crowding and unexpected shading can severely deter healthy growth.
- To discourage moss growth and help deter pests, put the planter on top of bricks or build short legs.
- To ensure the entire planter has enough water, consider adding a drip system that could run at a slow rate, but for a long time. By the end of the summer, some sections of the planter were not well watered.
- After the first year (or first season if your plants are heavy feeders), a diluted liquid fertilizer needs to be added to the routine.
